I am always on the look out for new places to visit, food and drink, walks and experiences and after a recent trip to Loch Tay I managed to seek out something rather special. Just a half hour drive from the busy A9 is the sweet village of Kenmore and the longest loch in Perthshire. This beautiful setting is where you can step back 2500 years in time to the early iron age and see what life was like, visit the reconstruction of a roundhouse with a guided tour with staff in period dress (what a great uniform for work!). When I heard about the tin casting workshop at the Scottish Crannog Centre I was super excited at the thought of learning something new, so I put my name down to join in.
History, learning dates and timelines has never been my strong point but that’s not to say I’m not interested I just know that I learn by doing and not reading. Anyway, so the tin casting workshop sounded intriguing and three hours would give an insight into the lives, ingenuity and resourcefulness of the people who lived on the loch side.
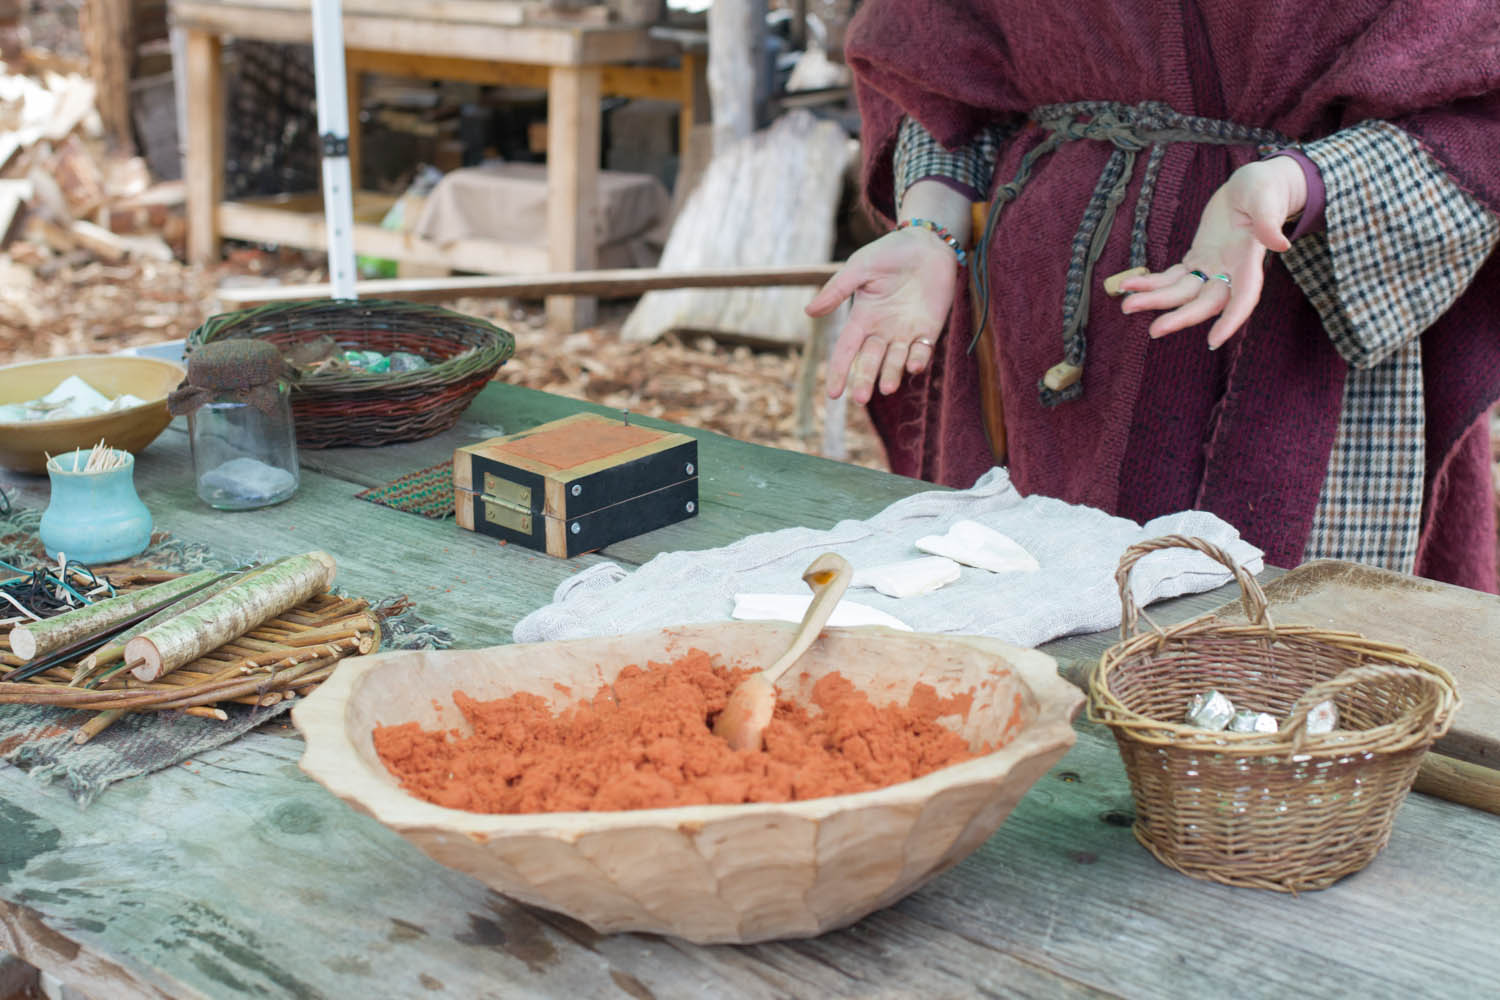
Along with me, there were three others – a couple from Derbyshire, here on holiday and a local man. Everything was set up, including a not so iron age gazebo to protect us from the elements; tools on the table and a fire.
Tin Casting at the Crannog Centre
Getting started
Rachel, our mentor, began by giving us a brief introduction into where iron is found, how it was mined and it’s uses. Then talked about the three types of tin casting that we would get to try our hand at using moulds of sand, clay and cuttlefish!
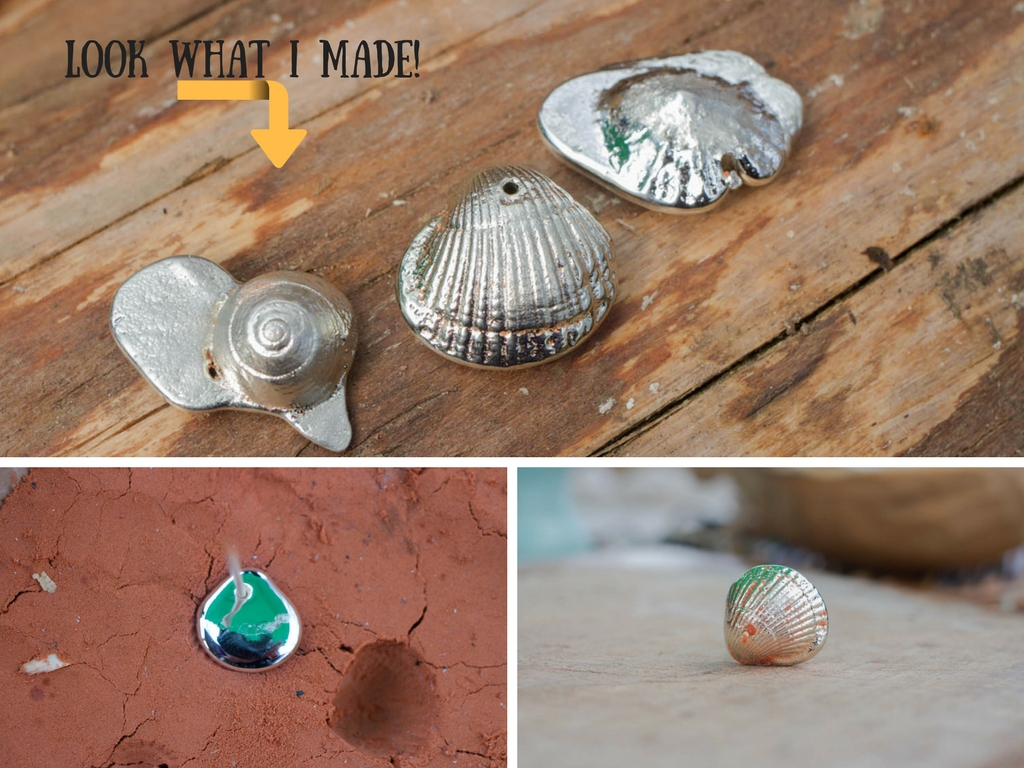
Starting off with a lump of clay I made it into a ball, rolled it, patted it and smoothed away any cracks or lines, ensuring my casts would not leak and would stay together. Then using a selection of small shells to make impressions in the clay. I used a snail shell, two different sized limpets and a piece of sea urchin shell. Now for the tricky bit. Melting the small tin pieces over the fire and pouring it carefully into my moulds. That may not seem too tricky but I am left handed and generally rubbish at cutting anything with a knife (fresh bread, cheese) in a straight line, or just the whole hand/eye co-ordination thing really! Not helped by the fire ladle only having it’s pouring lip on the right hand side. So the inevitable happened – I over poured! Not the end of the world just meant I got “extras” on my cast but all in all I was happy with my first effort.
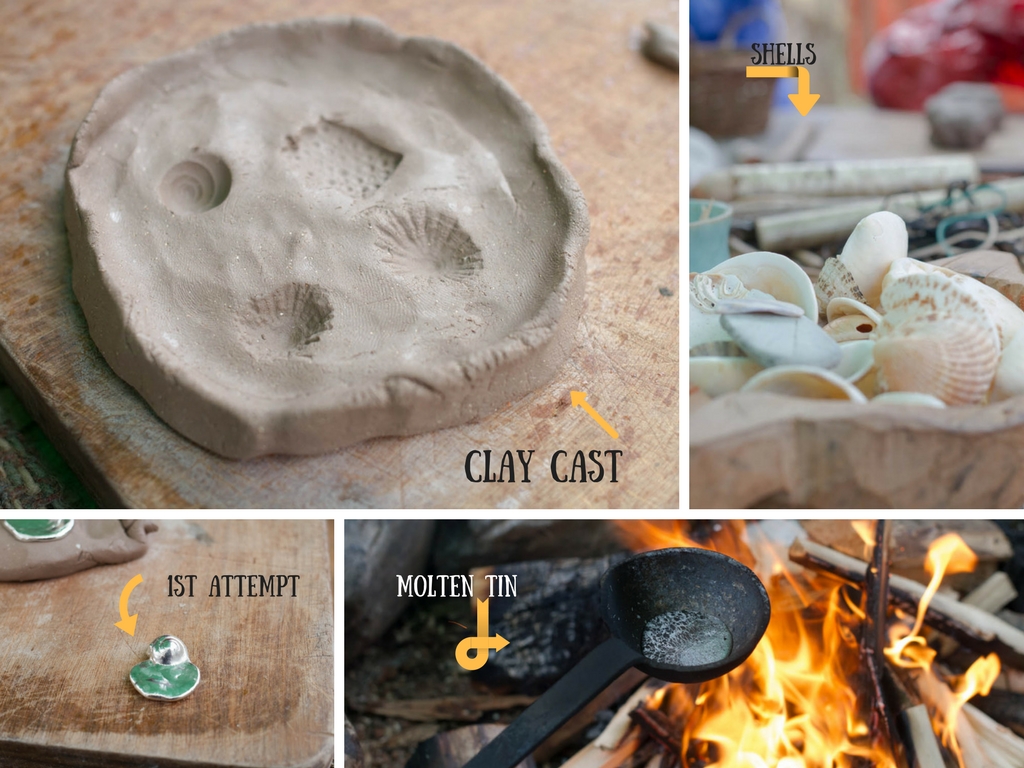
Sand Casting
The sand casting was a similar method – compacted sand in a wooden bowl, into which the shells are pressed and then removed. In an attempt to make a pendant I now placed a, not so iron age, cocktail stick, into my mould and left it there when I poured the tin. A near perfect pour this time (more by luck than judgement) and so I waited a few minutes whilst it cooled and set. Using the cocktail stick I picked up my casting from the sand and turned it upright. It was SO pretty, detailing all the lines along the shell.
The time was whizzing by, we had several short showers (thank goodness for the gazebo!) and managed a short coffee break with shortbread too. Looking out over Loch Tay to Kenmore has to be one of the best places for a brew that’s for sure.
Cuttlefish castings
Next. Cuttlefish castings. That’s right, the hard, white bone that can be found on beaches and that are given to budgies in cages too. It turns out that the inside of one of these is actually soft, can be carved and work really well as casts.
First job: to rub the two soft sides together and get as flush to one another as possible so that there are no gaps. This was a bit messy and making sure the fishy smell dusting went down wind and not cover everyone was tricky but I managed this better than the pouring of tin!
Next: press the ring, that I had been asked to bring with me when booking, into the soft foam like inside of the cuttlebone. Carve out a channel where the molten tin could be poured into the cast and place four small pieces of cocktail sticks around the mould to acts as dowelling rods; and then remove the ring.
With the two sides now together it was time to bind them with yarn and make the cast as tight as possible, with no escape for the liquid tin as it is poured. The cast is then wedged into a bucket of sand as it makes it safer for pouring and also helps to keep it all in one place. Of course, my first attempt didn’t go to plan and most of the tin seeped out of the sides. Really quite frustrating, especially when everyone else’s worked, but with the help of Rachel gave it another shot and using a different ring got an amazing cast. Check these out:
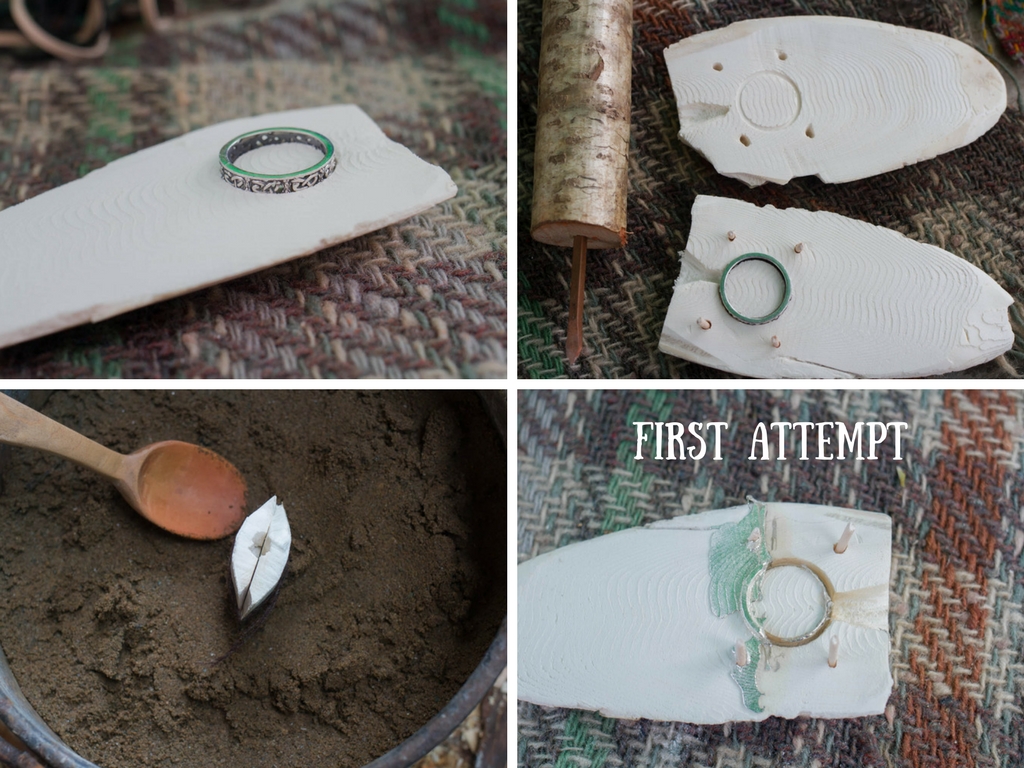
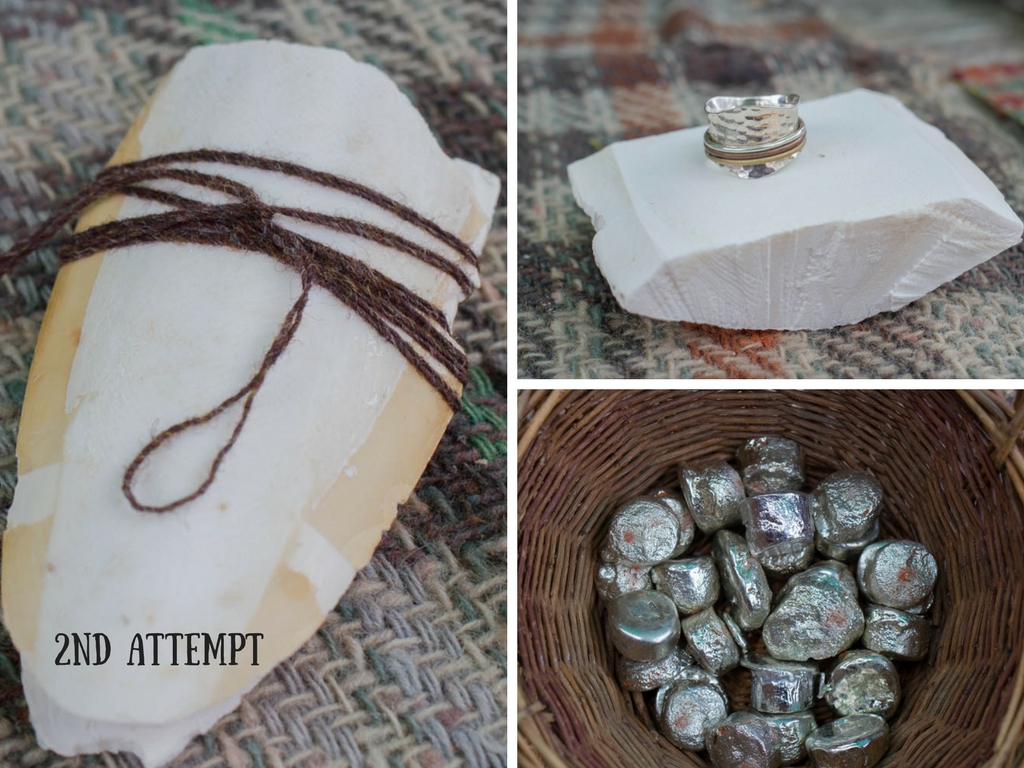
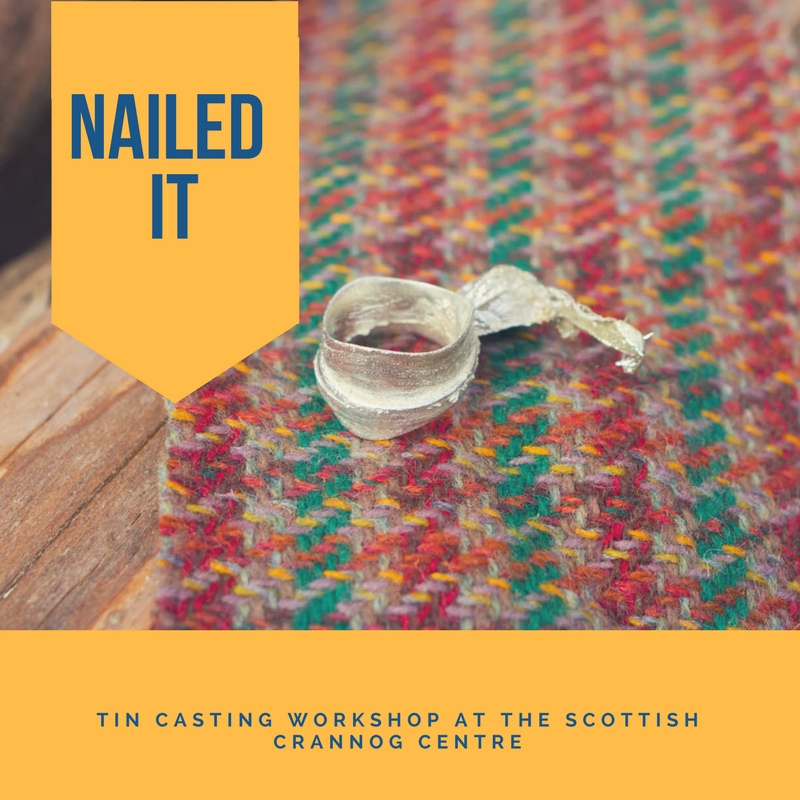
Absolutely thrilled that the second one worked out and with a bit of filing it is wearable. The tin has taken the imprint of the ring and the pattern of the cuttlebone, making this a truly unique piece of work. I love it.
The three hours whizzed by and I had a lot of fun, learnt a bit about life in the iron age and came away with a new skill (sort of). It is definitely something I would love to do again and has given me a fresh outlook on the type of workshops available in Perthshire. The staff at the centre are friendly, helpful, knowledgeable and so enthusiastic about the history, their highland location and keeping some of these traditions alive. Would I recommend a tin casting workshop at the Scottish Crannog Centre? Hell yeah.
Sounds great Mel and what a pretty setting too! I definitely want to try this. Like you, I learn better from doing rather than reading. Love the shell and ring! This is something you can do in any type of weather as there was a gazebo sheltering you all whilst you worked. Well done! 🙂
I am super chuffed with myself for finding this workshop and I had a really good time. They’re doing other ones throughout the season too. Well worth looking at
[…] at the marina restaurant and we were at the Scottish Crannog Centre. A couple of months ago I did a tin casting workshop at the centre and had a brilliant time but didn’t get a chance to have a tour of the Crannog […]